Thursday, April 19, 2018

Firewall Exceptions in Munki

We recently updated some security procedures including making running the OS firewall mandatory. The software was tested on Windows 10 and exceptions created in the GPOs for everything we found after installing ALL our software on several computers over several days.

But I made an oversight when testing the macOS software leaving out several categories of programs. Therefore the firewall was enabled in macOS and users almost immediately started receiving pop-ups to allow or deny known software.

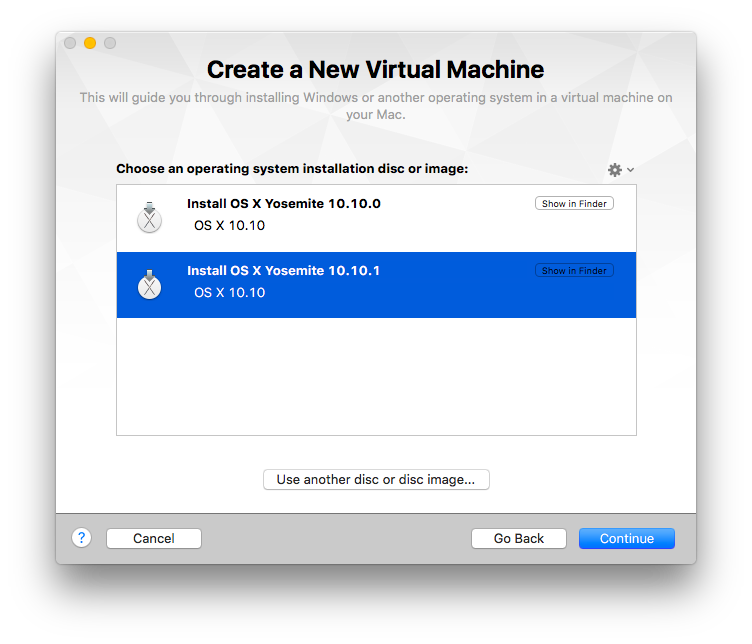
I configured the firewall using a profile created in Apple's Profile Manager that was edited down to only the required items for the task at hand. I was dismayed upon returning to Profile Manager the next day to discover that there was no way (at least that I could see) to add unlisted applications to the list provided in the browser. Of course, none of the items below appeared in the list despite being installed onto the mini.

After some quick Googling I turned to twitter and slack.


@isaac responded in the macadmins Slack that adding exceptions was really quite simple

10.12 does not have man page for socketfilterfw but 10.13 does!


Here are the items that needed to exceptions to prevent pop-ups.

  1. useragent = this is LightSpeed's binary that lives at /usr/local/bin.
  2. SMART Response = a piece of this here /Applications/SMART\ Technologies/Response\ Desktop\ Menu.app/Contents/Resources/ResponseSoftwareService.app
  3. TI CX CAS Teacher Software = this was in the firewall list on my buildbox so I either allowed it at some point or was playing around with the rules and forgot. Either way I'll just add it now. /Applications/TI-Nspire\ CX\ CAS\ Teacher\ Software.App

The firewall configuration profile was fine, it did exactly what I needed it to do and Munki won't install a profile again if it is exactly the same as an existing profile. So instead of changing the profile arbitrarily I am resolving this in two ways.


Solution 1

I've added a postinstall_script to the profile's installation instructions in munki and bumped the version to 0.2. This will take care of any NEW installations of the profile. So if any of the software exists on the system when the firewall profile is installed then the exceptions will be created.


PROTIP: you can right-click an existing rule in System Preferences to "Show in Finder". Then just drag into terminal. It is nice and quick even if it escapes spaces instead of quoting the strings ;)


Solution 2

I also created an update_for item for each of the affected apps in munki. These are simply postinstall scripts in pseudo payload free packages. This will not only add the exception rule to any existing installation of TI-Nspire, LightSpeed User Agent, or SMART Notebook/Response, it will also ensure that if these programs are installed in the future that the known exceptions will be applied. These are marked as unattended_install so munki will do them in background runs without user intervention.


socketfilterfw will also not error when a duplicate app is added so there is no problem if solution 2 is triggered after solution 1 is already applied.


In fact it doesn't appear to return proper error codes at all 


>sad_trombone.mp3


Friday, January 20, 2017

Investigating Virus/PUA Alerts for mounted dmg

This is a Copy & Paste from our internal ticketing system I made a few months ago re: Virus alerts. Which can sometimes just show you something like /Volumes/some/bad/path. Hoping someone else finds it useful.


Ryan Manly added a private note 9 months ago (Tue, May 3, 2016 at 10:53 AM)
When I remotely controlled the computer the dmg was still mounted on the desktop with the generic dmg icon.

new
old


Heading to the terminal I executed the command hdiutil info. This command will tell you path to the dmg file that is attached. This is shown below as image-path.
Once we know the location of the source dmg file we can list the metadata for the file. We do this by executing mdls /path/to/file.dmg. OS X will tag downloads with a kMDItemWhereFroms attribute this will show us where the malware came from. If needed further analysis can be performed using osxcollector or similar to see which browser was used etc.

This info can also be used to block bad domains… set2updatenow.preparedupdate.xyz in this case.

Friday, December 4, 2015

SmartMusic crash on Launch Caused by Bad EPSON audio kext

I received a ticket for SmartMusic crashing on launch from a teacher at one of our schools. This issue did not occur in much older versions of the software. Only in software after the late 2014 releases. Because my troubleshooting did not reveal anything in particular or resolve the issue I opened a ticket with makemusic.

I sent them the crash logs and system information report from the computer in question and they came back with this info:

"If you look at the audio section of System profile you've send me, it will tell you "There was an error while gathering this information." This will commonly cause newer versions of SmartMusic to crash on Mac."

After some experimentation today I discovered that the problem was caused by the "EPSON Projector Audio" kernel extension installed via EasyMP Network Projection that we use with our wireless projectors. System Information shows the same error on all machines I've tested with the software installed.

Unfortunately the uninstallation tool provided with the software does not remove the kext. In El Capitan the offender can simply be removed from /Library/Extensions, in earlier versions of OS X the kext can be found in both /Library/Extensions and /System/Library/Extensions.

The wireless projector software still functions without the sound kext, it is only required for utilizing the speaker in the projector itself.

Once the kext was removed and the computer was rebooted not only did the audio information populate correctly in System Information but the SmartMusic ran properly.

Tuesday, November 24, 2015

Configuring an OS X Guest for a Vagrant base box

In the guest OS we need to complete four tasks in order for vagrant to be able to do the things it expects to be able to do. In simple terms we need to do the following:

  1. create a user vagrant with password vagrant
  2. install VMware Tools
  3. enable and configure ssh
  4. configure sudo

1. create a user vagrant with password vagrant

To meet the first requirement we can simply go through Setup Assistant in the guest OS X instance specifying the account name vagrant and the password vagrant.


2. install VMware tools

Once we have a usable machine the next thing we should do is install the VMware Tools. This allows the vagrant project folder to be mounted in the guest at /vagrant. To do this VMware will mount a disc inside the virtual machine that contains the VMware tools installer.
  • In the host OS select the Virtual Machine menu in VMware Fusion
  • Select Install VMware Tools
  • Fusion will present a warning sheet informing you that it will mount a fake disc in order to complete the installation. Simply click Install
  • In the guest OS double click on the Install VMware Tools package and restart the VM when prompted. (doing this in Catalina may require approving, restarting, and installing again)


3. To enable and configure ssh we need to do the following:

  • enable ssh aka Remote Login in System Preferences' Sharing pane

  • Vagrant boxes typically allow login via publicly available keys. This can be changed, if required, for security reasons but that is beyond the scope of this document. Also, when `vagrant up` detects that the public key is in use it automatically creates a new key and injects it into the machine increasing the security somewhat. To enable login via key we need to create a hidden folder and obtain the public key from github.
  • The Vagrant docs suggest that we disable DNS lookups to increase ssh performance for VMs that may not have a connection to the internet.
    • still within Terminal open sshd_config in your editor of choice (EDIT: since written this post has incorrectly stated that you should edit ssh_config but that is incorrect)
      • sudo vim /etc/ssh/sshd_config
    • uncomment the existing line for this entry and save the file
      • UseDNS no


4. configure sudo

The last thing we need to configure in the VM is sudo. Vagrant uses sudo to perform tasks in the guest OS that require elevated privileges. The docs also suggest setting the root password to vagrant but this is not required, especially in OS X where root availability is not an expectation. Configuring sudo properly is very important to prevent errors later.

Use visudo to edit /etc/sudoers

EDIT: key presses removed as they are no longer accurate.
  • add an entry below the %admin group as shown in the screenshot below
The vagrant line should look like this before you :wq


Cleanup

As a final bit of cleanup before shutting down:
  • type the command "history -c" in Terminal and then quit it
    • clearing history in zsh (Catalina+) is a bit more annoying.
      • by default you need to exit the shell, run a new one, and `rm .zsh_history`
        • yes this will still show that rm
  • clear Recent Folders in the Go menu of Finder
  • clear Recent Items in the Apple Menu


In the next post we will pack up the VM into a box and finally start playing with vagrant.

Installing OS X into a VM for a Vagrant base box

To begin creating base boxes everything you need to know is available in the Vagrant documentation here and here. As far as what you need to own, VMware Fusion and the VMware Fusion Provider make things easier for OS X.

This first page will simply show you how to install OS X into a new VMware VM. If you have done this many times please take a quick skim through this page as we are going to make some modifications to ease the creation of our Vagrant box version catalog. I will mark these steps with a bold *.

Follow along with my graphical guide.

1. Create a New VM and select the OS X Installer app.
2. * At this point you will drag in (or select via dialog) an OS X installer app. This is the first step where the end goal matters. I want a catalog of OS X Versions available to me so I can spin up any point release at any time.

Why?

Because it is cool.

Also, for testing.

Because of this I have already copied all the installation app versions of Yosemite onto this computer (except 10.10.5 I already have a base box for that). We will start our journey with 10.10.0.
3. * Now we want to customize our VM. Click Customize Settings
4. * To do this Fusion requires that we save the configuration. The major os version is pre-populated as the VM name. We want to add (at the least) the minor version number to make this particular VM easier to find and keep track of later.

5. After a few moments at the following screen you will be presented with a window very similar to System Preferences.

6. * We are concerned with only a few settings here. These are highlighted below.

  • We will change the networking on the VM from NAT to bridged.
  • Adjusting the size of the drive is not required but if you plan to use the VM for testing large installations etc. you may want more than the default of 40GB.
  • Removing the Sound Card, Camera, and USB controller is recommended by the documentation. I believe this is just to reduce Linux complexity and also reflects Vagrant's origins as a developer tool more than anything. The Sound Card and Camera can be removed but Fusion will tell you that OS X requires USB if you try to remove that functionality.

7. * In Network Adapter the circles on the right function as radio buttons and must be clicked to change this setting.

8. Changing the size of the virtual drive will require erasing or resizing the volume once the guest OS is running.


9. We can remove the sound card and the camera even though I don't think it is really necessary for an OS X box, the documentation suggests it.

*shrug*

10. Now that the hardware configuration is complete we can close the settings window and start up the VM.
11. The OS X installation environment is probably very familiar to anyone reading this. If you did change the size of the hard drive in the virtual machine now is a good time to fix the volume size. This can be done by erasing the volume or simply changing the size of the partition. 

HINT: changing the size of the partition is MUCH faster.
  • Select Disk Utility from the OS X Utilities window
  • Highlight the VMware Virtual Machine Drive
  • Select the Partition tab
  • Now grab the lower right corner (red arrow) of the partition graphic and drag it down to expand the partition into the available free space.
  • Click Partition on the warning sheet.
  • Success!
12. Close Disk Utility and begin the Installation of OS X.
13. * Once the installation is underway go back up to the top of this article and start again with the installer app for 10.10.1! I have found that two installations running simultaneously does not hinder things too much.


My next post will detail the changes required inside the guest OS in order for vagrant to do vagranty things. In the meantime create VMs for 10.10.2-10.10.5 if Yosemite is still important for you or create VMs for 10.11.0 and 10.11.1.